Configuring the Algorithm
The file nav_algo/__main__.py contains information about the event algorithm being run as well as the waypoints that should be reached. The waypoints are read from a csv file in the nav_algo/waypoints directory. Each line of the file should include one waypoint in the format: latitude, longitude. See the nav_algo/waypoints/test.csv file for an example. The waypoints, along with the event parameter, will be passed into the call to nav.NavigationController(). An example of what this call should look like is shown below.
def main():
    # change the line below to point to your waypoint file
    waypoint_file = 'nav_algo/waypoints/test.csv'
    waypoints = readWaypoints(waypoint_file)

    nav_controller = nav.NavigationController(waypoints=waypoints, event=events.FLEET_RACE)
The options for the event parameter are:
events.ENDURANCE
events.STATION_KEEPING
events.PRECISION_NAVIGATION
events.COLLISION_AVOIDANCE
events.SEARCH
events.FLEET_RACE
None
The default is fleet race, which only allows manual control of the boat. To just run the navigation algorithm without an event, use None as the event parameter.
Setting Waypoints for Specific Events
The locations and meanings of the waypoints will vary based on which event algorithm is being run. To just run the navigation algorithm without an event, the waypoints are points along the path that you want the sailboat to execute. For each event the waypoints should be set as shown in the table below.
| Event | Waypoint Representation |
|---|---|
| Fleet Race | One waypoint is required that will be used as the center of the (x, y) plane |
| Endurance | Four waypoints at the buoy locations in clockwise order starting from top left |
| Station Keeping | Four waypoints at the buoy locations in order [North West, North East, South East, South West] |
| Precision Navigation | Four waypoints at the buoy locations in order [top left, top right, bottom left, bottom right] where the start/finish location is between the top left and top right buoys |
Starting the Algorithm
The navigation algorithm is implemented as a Python module. This is why imports must be done with dot notation rather than as files. It also requires us to use the -m option when running the terminal command to start the algorithm. The following command can be used to run the algorithm. Using the nohup flag tells the raspberry pi not to stop executing the navigation algorithm if the raspberry pi disconnects from ssh when it loses Wi-Fi connection. It also means that the only way to stop the algorithm is to send the kill command (see below) or to restart the raspberry pi, so you may exclude it when it is not necessary.
nohup python3 -m nav_algo
Using the GUI
Required Libraries
The GUI uses Qt5 and QtGui along with a few support libraries. Install them on your computer using the commands below. Do them one at a time in case you run into installation errors. You may need to install specific versions of these libraries (e.g. I had to install version 5.12 of PyQt5).
Future Work: Qt5 is not user-friendly to install. It would be useful to have a dedicated laptop for the team with everything needed already installed or switch to another GUI library (although this would require re-implementing the entire GUI).
pip3 install PyQt5
pip3 install pyqtgraph
pip3 install numpy
pip3 install pyserial
Running the GUI
Note: Previous instructions have said to use basestation.py instead of basestation_standalone.py to run the real/non-test version of the GUI. I am now convinced that is not necessary and that basestation_standalone.py is the better version to use. It is also updated to support manual control whereas basestation.py is not.
Clone the GUI repository from GitHub and cd into the GUI directory. You’ll need to change one line of basestation_standalone.py to ensure that it is using the correct serial port on your computer to communicate with the XBee. On line 39, change the serial port name (the first argument) to match the one that the XBee is connected to. Here’s an example of what that looks like for my computer:
# serial port to read from (different for everyone)
serial_port = serial.Serial('/dev/cu.usbmodem14201', 9600, timeout=0.25)
To run the GUI, use the following command.
python3 basestation_standalone.py
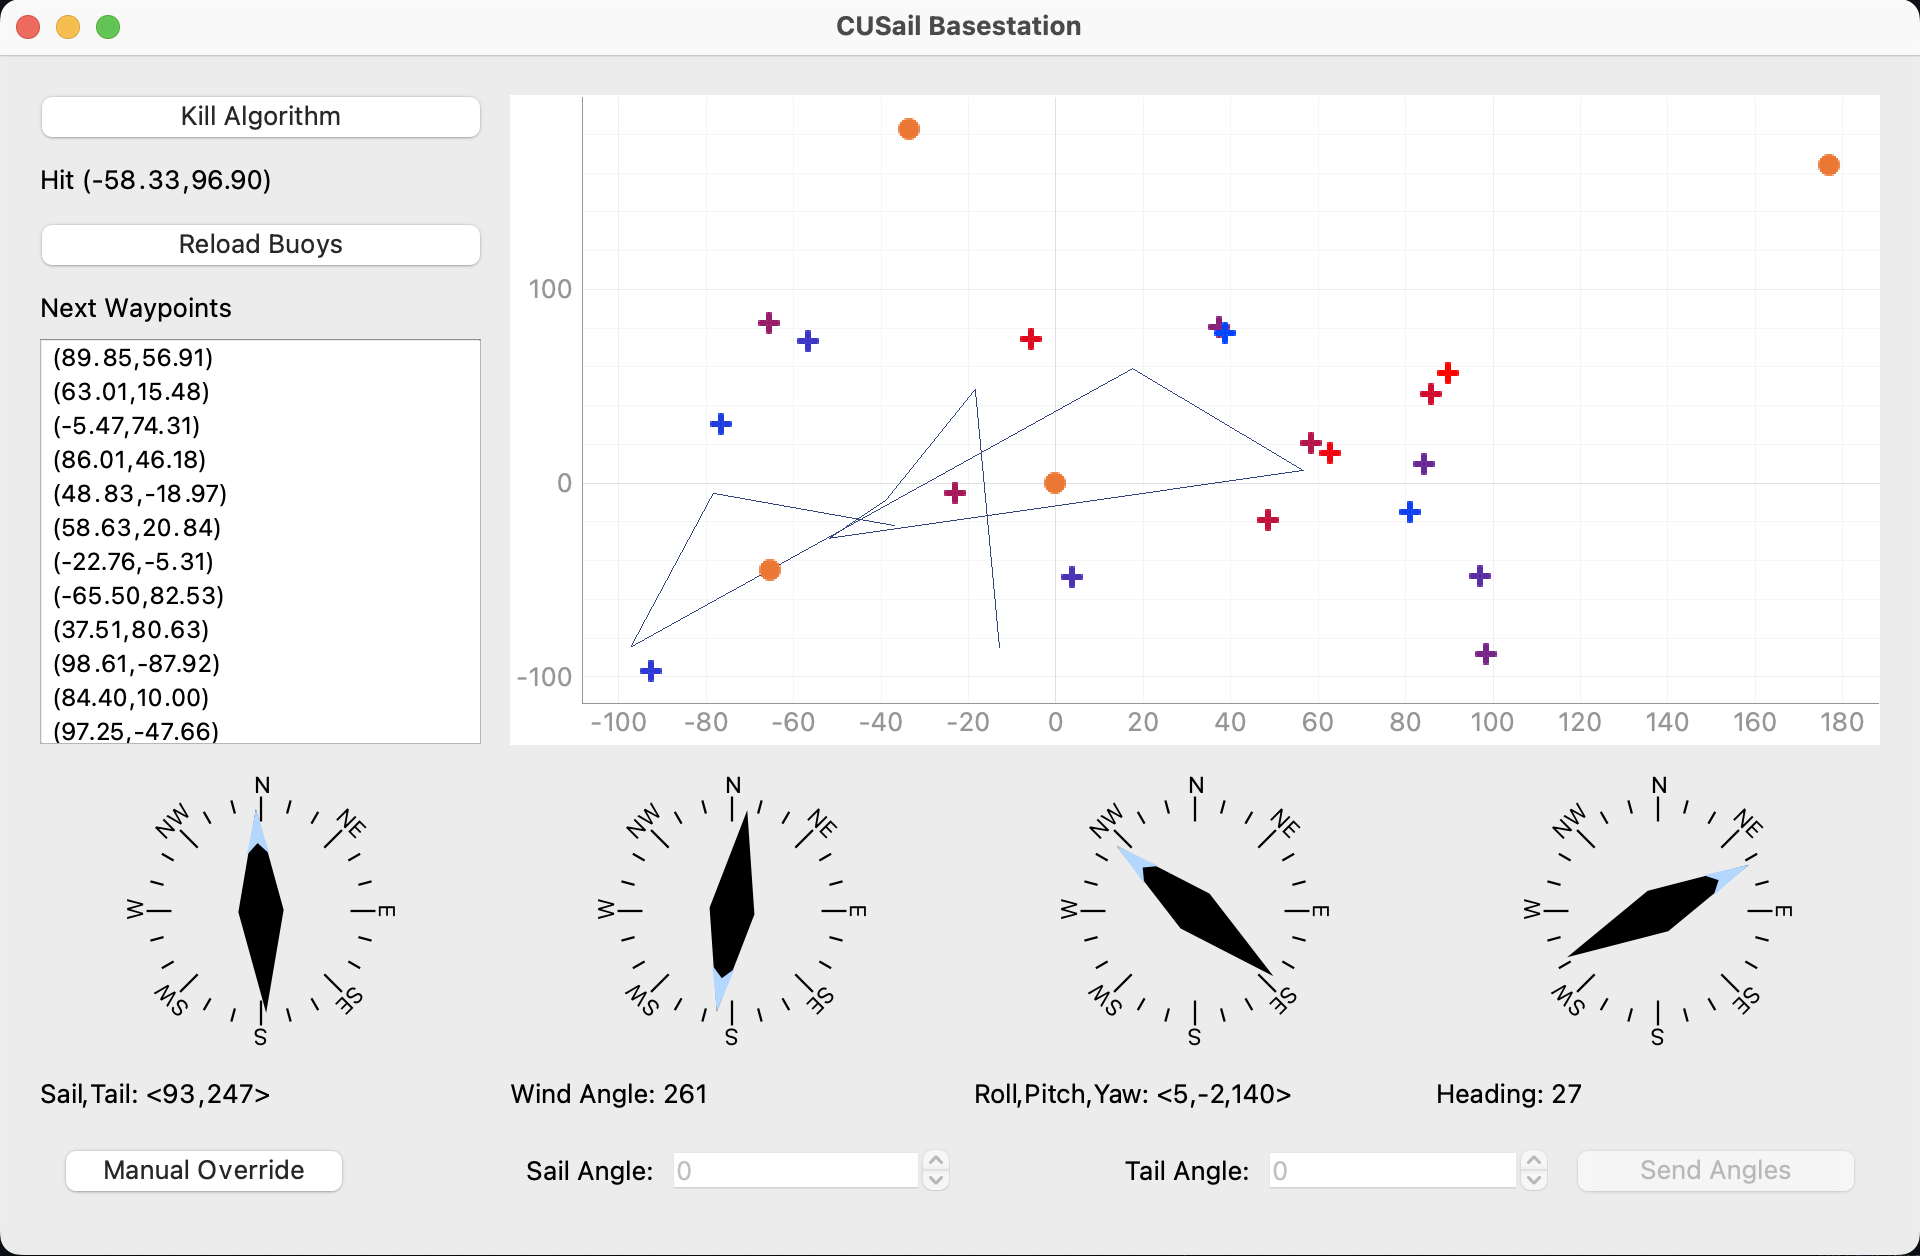
The GUI should look like this:

The map is in the (x, y) coordinate system where the x-axis represents East and the y-axis represents North, etc.
The orange dots on the map represent buoys. These don’t affect the nav algo, but you can use them to mark important locations, just so you can see them in relation to the boat’s position. You can edit these points by changing the GUI/gui_input/buoy.csv file. It is just a list of latitude/longitude pairs. You can reload the buoys on the map with the Reload Buoys button if you change them.
The line on the map represents the movement of the sailboat over time. The last 20 location data points are displayed.
The plus signs on the map represent waypoints. The colors range from red to blue. Red waypoints are sooner than blue waypoints. The waypoints are also listed in order in the sidebar.
The compass widgets on the bottom show and list sensor data received from the sailboat. The compasses themselves show the mainsail angle, wind angle, yaw, and heading (actual direction of motion) wrt North.
All of the data received by the GUI from the sailboat is written to an output file: GUI/gui_output/log-DATE.csv. You can use this to debug the nav algo if something goes wrong.
Manual Control over GUI
There is a button in the upper left of the GUI labeled Kill Algorithm. Clicking this button will send a kill command to the algorithm and immediately stop it from working. You should only use this if you are absolutely certain that you want the boat to stop functioning. You will not be able to recover manual control or autopilot from the GUI after hitting this button and the boat will stop transmitting data. To restart the algorithm, you will need to rerun it over ssh or the raspberry pi directly.
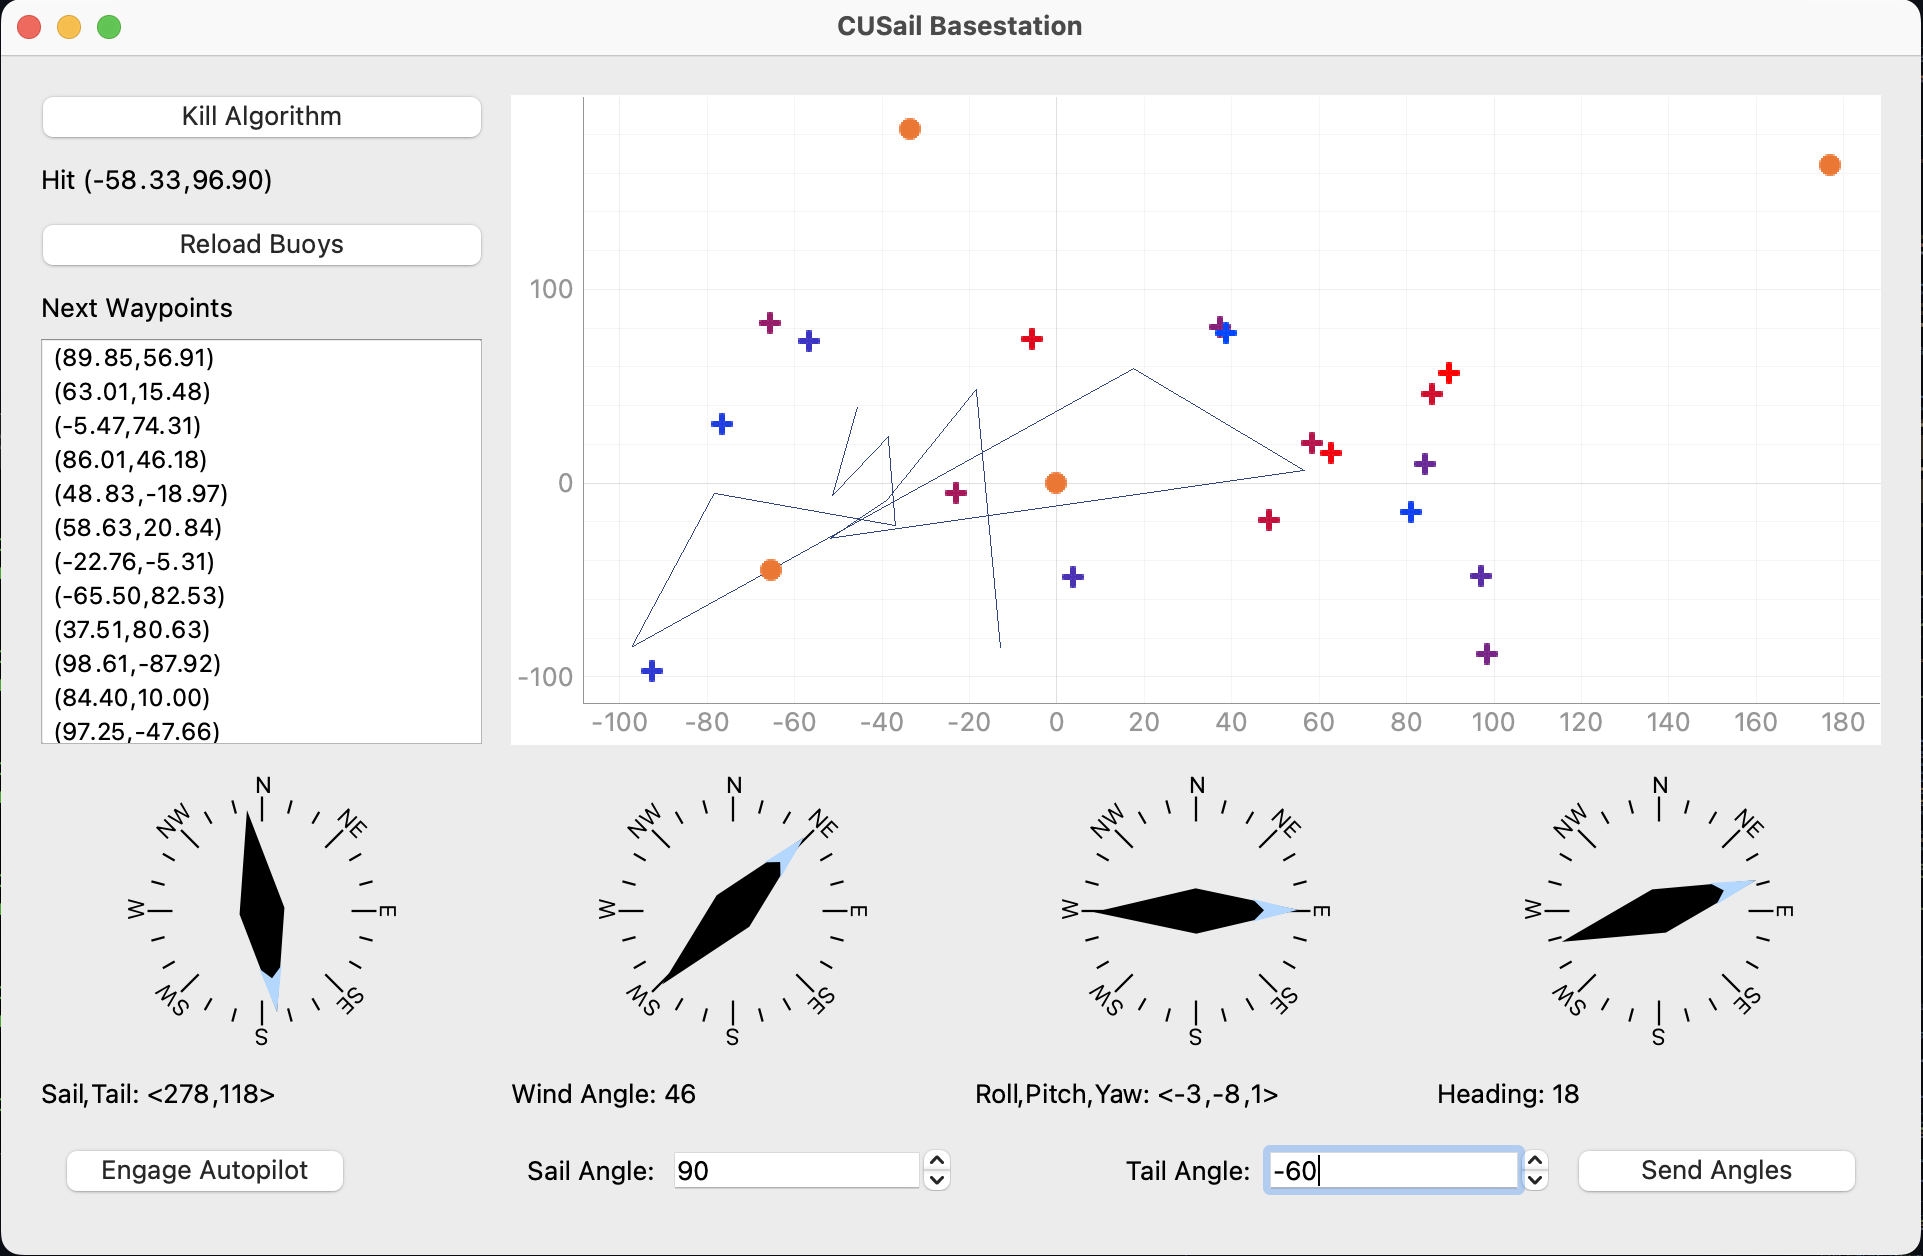
There is also the option to manually set the sail and rudder angles by using the GUI. To do this, press the Manual Control button at the bottom left corner. This will enable the manual control options and the GUI should now look like this:

You can enter the desired sail and rudder angles into their respective inputs and send them to the boat with the Send Angles button. Note that the GUI does not check that these angles are actually achievable and entering extreme angles may damage the servos. You can resume autonomous control of the sailboat by pressing the Engage Autopilot button, although this will not work if the navigation algorithm is run with the fleet race event parameter as this only supports manual control.
Manual Control over UART
It is also possible to manually control the boat only using UART communication. The following commands can be sent to the sailboat:
| Command | Function | Notes |
|---|---|---|
| q | Quit the navigation algorithm (killswitch) | |
| o | Enter manual override mode | Allows manually setting sail angles - not necessary for fleet race |
| ‘sail’ ‘tail’ | Set the sail and tail angles | Must be in fleet race or override mode; must be space delineated |
Note: All commands must be terminated with a newline (\n) character. This is default in the Arduino serial monitor, but may need to be manually added if other serial interfaces are used.